
Jan 31, 2025
·
4
min read
As part of my Master’s programme in content strategy, I learnt that content modelling helps structure content for consistency, reusability and easier management. I liked how modelling makes content more organised and scalable.
Inspired by what I learnt, I decided to apply content modelling to my personal life – specifically, to organise my recipe collection. In this article, I’ll share how I created a structured recipe database (with a connected shopping list), the benefits I've enjoyed and how you can apply content modelling to your own projects.
Why content modelling for recipes?
Like many people who enjoy cooking, I’ve saved countless recipes over time from various sources – videos, Instagram posts, websites. These were scattered in different places and I found it difficult to find them when I needed them (usually when I tend to be really hungry). The recipes also had different, inconsistent formats.
Content modelling helps me structure information into clear and defined fields. Rather than treating each recipe as a single block of text, I could break it down into standardised fields such as ingredients, cuisine type and instructions. This makes it easier to find, filter and use my recipes.
(For more on the benefits of content modelling – specifically in the context of user experience – check out my previous article.)
Applying content modelling to my recipe collection
In our lectures, we learnt that a good content model should:
Define content types and their relationships
Standardise attributes to ensure consistency
Enable reusability and adaptability across different contexts
Following these principles, I created a content model for my recipes and ingredients. Here’s how I structured them:
Recipe content type fields
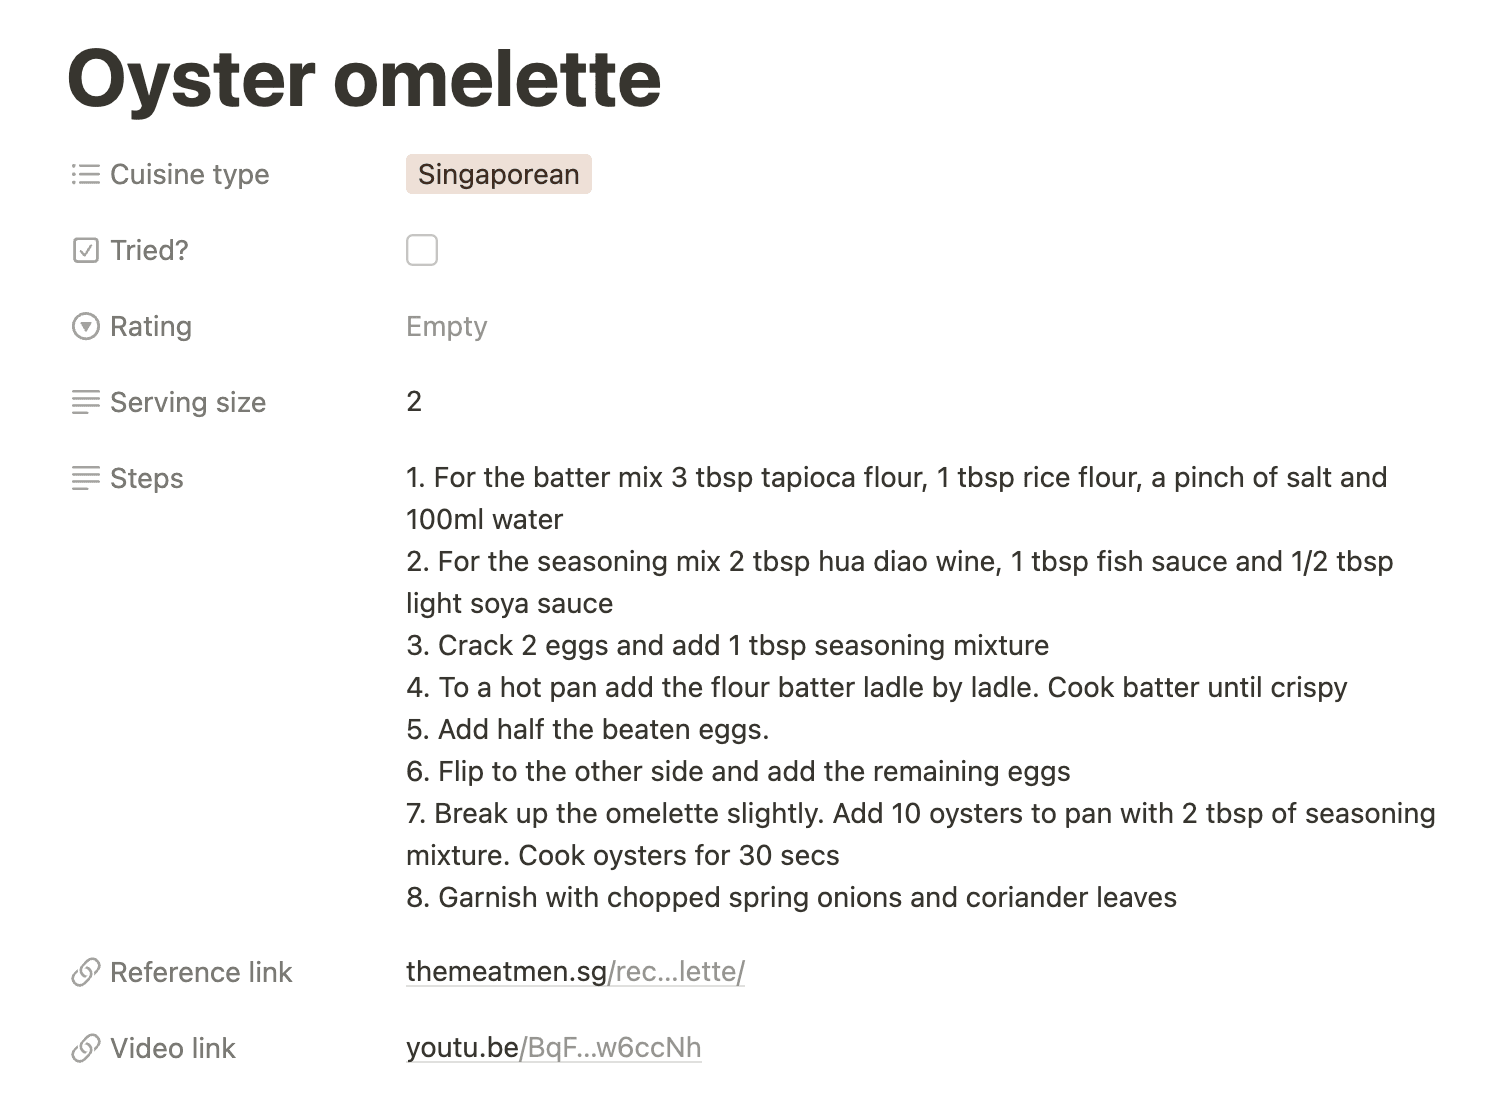
Recipe name: The name of the dish (e.g. Spinach and mushroom quiche).
Cuisine type: Categorisation by cuisine (e.g. Chinese, Korean, Austrian, French).
Tried?: A checkbox indicating whether I’ve cooked the recipe.
Rating: My personal rating after I've tried the recipe (👍 Liked, 👌 So-so, 👎 Disliked).
Creation date: The date I added the recipe.
Ingredients: Linked to ingredient content type for easy reference.
Serving size: Number of servings the recipe makes.
Steps: Step-by-step cooking instructions.
Image: An image that can be used as a thumbnail for quick reference in the recipes database.
Reference link: A link to the source, if applicable.
Video link: A video tutorial link, if available.
Ingredient content type fields
Name: The name of the ingredient (e.g. Spinach, Garlic, Flour).
Amount needed: The quantity required for recipes.
To buy?: A checkbox to mark ingredients I need to purchase.
Using Notion, I set up linked databases for Recipes and Ingredients.
Recipes listing (Tried-and-tasted recipes view):
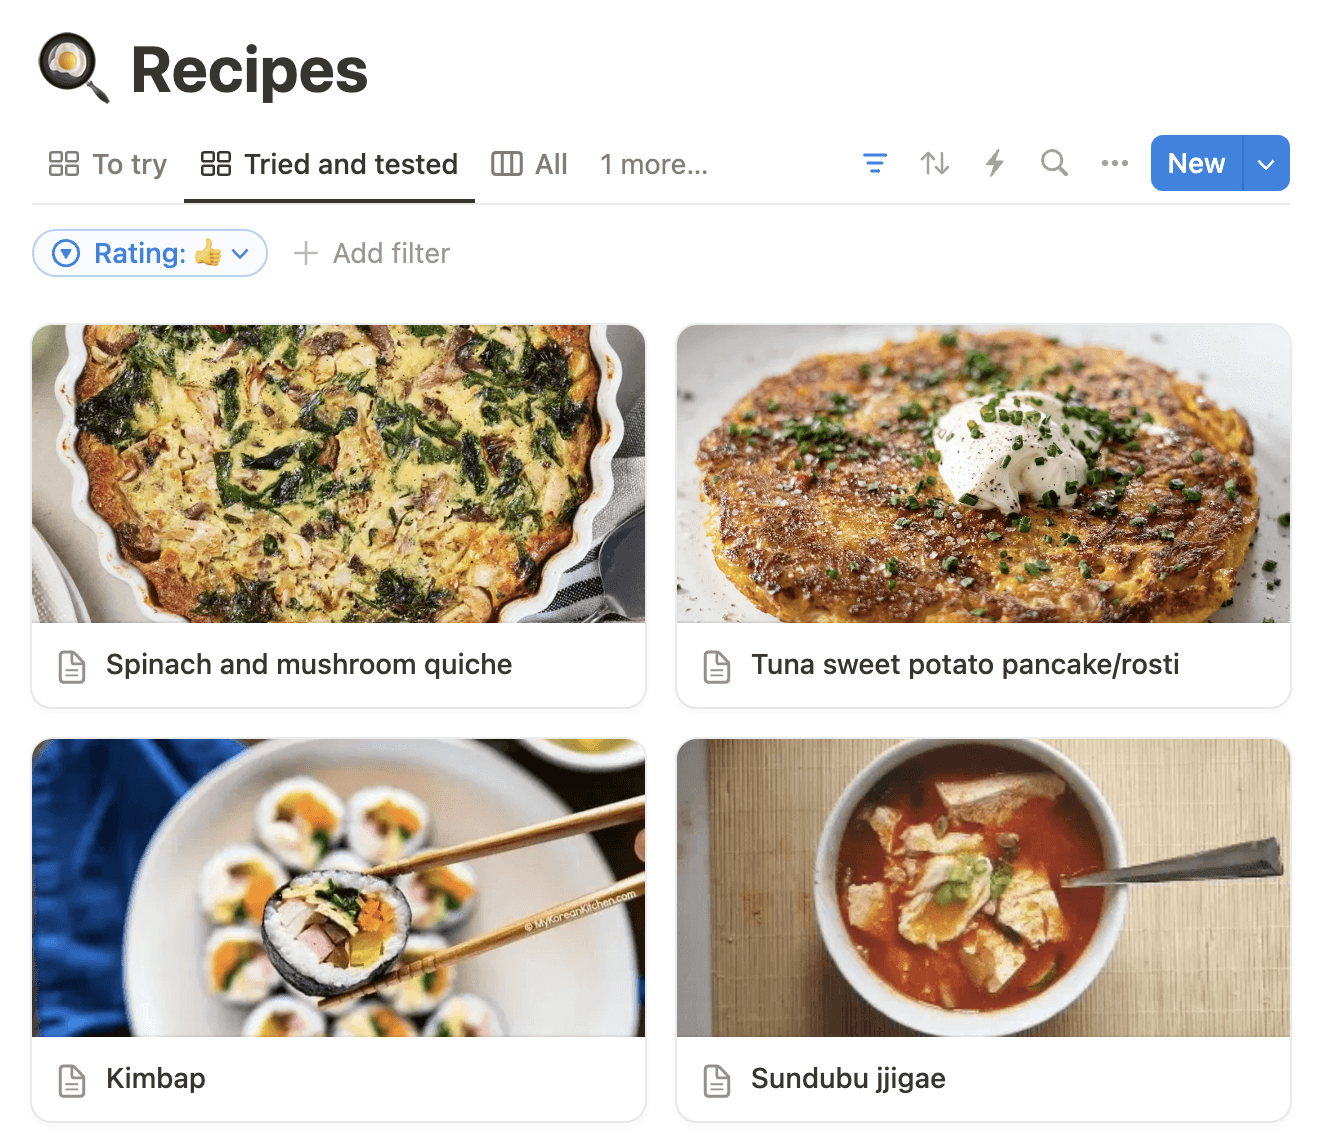
While there is a central view of all recipes, I created separate board views for tried-and-tested ones versus those I've yet to try.
Recipe detail page:
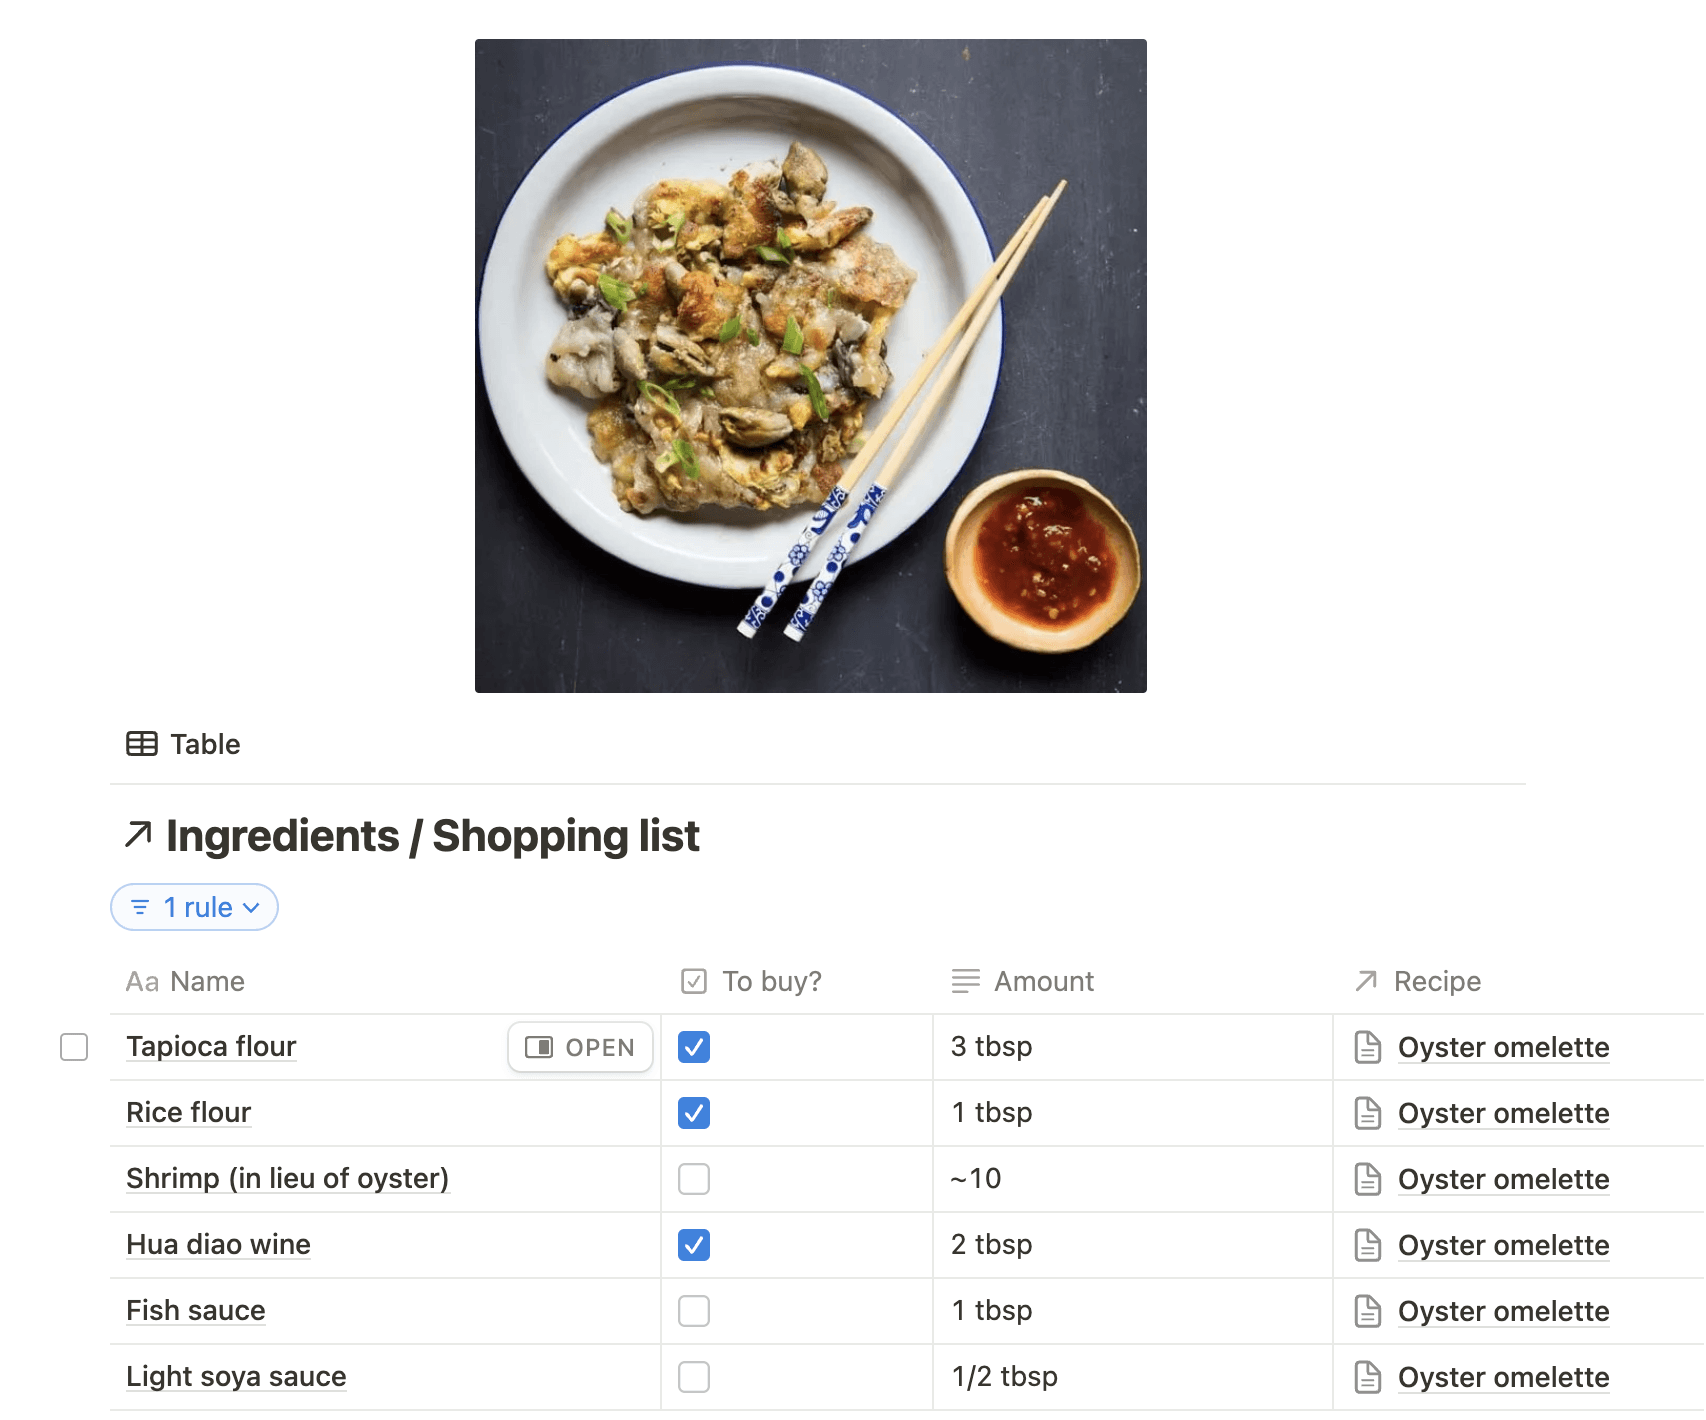
Each recipe detail page contains a linked view of Ingredients database, which shows only the ingredients tagged to that recipe.
Ingredients database (To buy view):
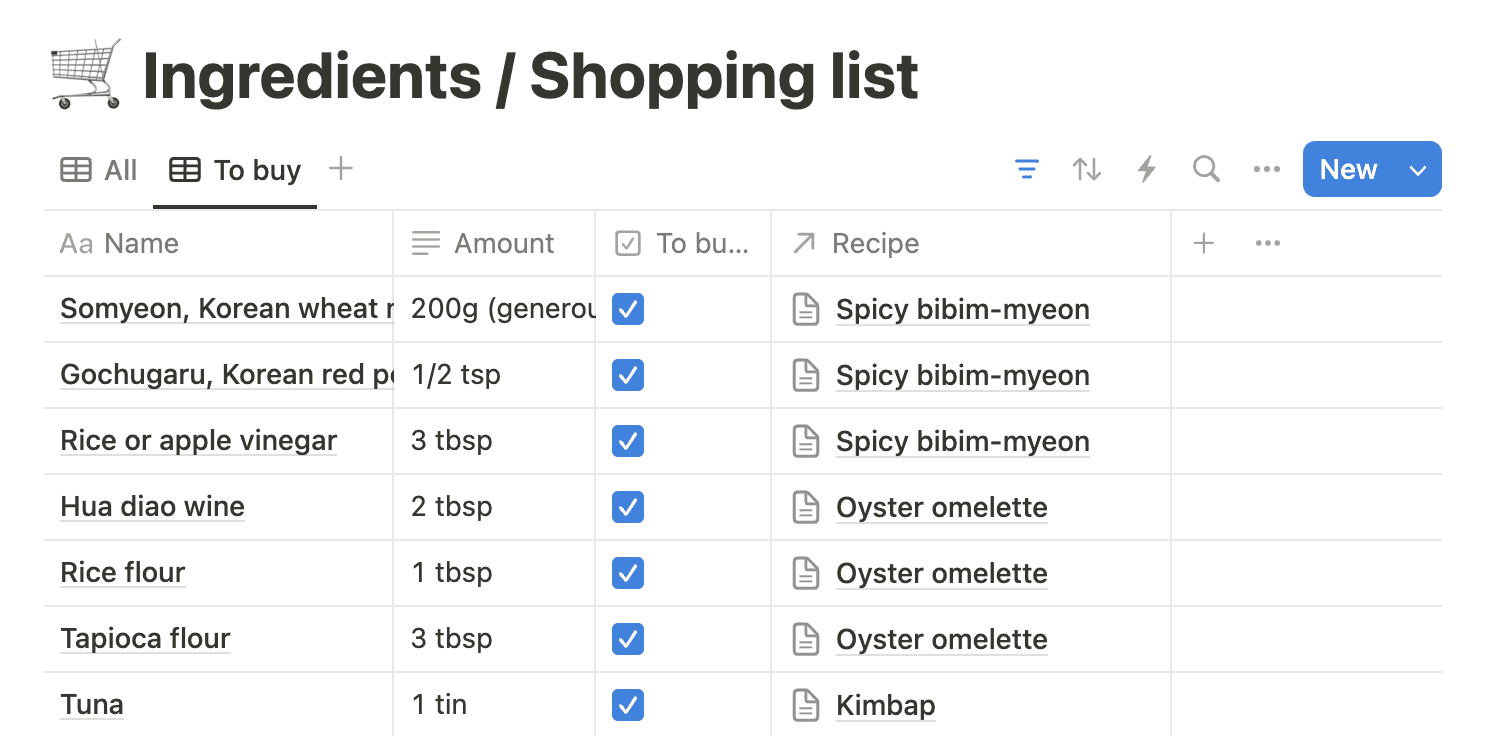
This view is filtered for ingredients that I need to buy based on what I intend to cook. After I've picked up an ingredient, I will uncheck the box.
Benefits of modelling my recipe collection
Since applying content modelling to my recipes, I’ve noticed several benefits:
Easier searching and filtering – I can quickly filter recipes by cuisine type, ingredients or rating.
Clearer grocery shopping – I have a better idea of what to buy without needing to scroll through full recipes at the supermarket or scramble over last-minute decisions.
Better meal planning – I can plan recipes based on ingredients I already have, minimising food waste.
How you can apply content modelling to your life
If you want to try content modelling for yourself, here are some simple steps:
Identify an area where structured content would help (e.g. recipes, books, travel plans).
Define the content types and their relationships (e.g. recipes and ingredients, books and authors, countries and specific destinations).
Break each content type down into fields that define each entry.
Choose a tool that supports structuring and linking content
Tip: While I used Notion and highly recommend it for its simplicity and ease of use, this can also be done with other tools that support structured data and cross-referencing, such as Airtable or Google Sheets (with structured formulas). The key is choosing a tool that allows you to link different content types and generate dynamic lists.
Organise your data and test filters or views customised to your needs.
Iterate and refine as needed.
Useful resources:
A guide to what content modelling is and how to get started, written by one of my lecturers, Carrie Hane
Have you applied content modelling to something in your life, or do you have questions about modelling content? I’d love to hear from you!